Nintendo Switch Rear Housing Assembly | Boxy Pixel
Boxy Pixel Nintendo Switch Rear Housing Installation
This is a working document, describing the basic steps to install the rear housing on an original switch
Items Needed:
- Tri-wing and phillips screwdriver
Warning!
Please take extra care with the fasteners. The fastener heads and the threads are very small.
- When assembling, do not force the fastener. If you feel resistance, reevaluate your fastener length or back out, clean and try again.
- Choosing the correct fastener is a balance between having a safe amount of thread engagement and also not putting a fastener in that is too long which can risk breaking or stripping. Take your time
Additional Fastener Rules:
- Ensure you have the correctly sized Philips drive that is also not worn. It makes all the difference.
- For all fasteners, make sure parts are aligned before screwing together.
- For all parts, ensure the parts are fully seated and hold the parts together when fastening. I would recommend against having the fastener pull the parts together. This is especially important when fastening the front/rear housings.
- When starting a screw, I will often turn in counterclockwise to start. You should "feel" when the screw catches the first thread. Then, I gently turn clockwise. If you feel any resistance, stop and reevaluate. Personally, I use my fingertips to turn the screwdriver while applying enough downward pressure to keep the driver engaged. If you are stripping the screw head - you have far too much resistance and/or the incorrect driver.
- Whenever you have more than one screw to attach two parts together - always start all screws first before tightening one down.
Step 1:
Remove the plastic rear panel. There are two bottom fasteners, 1 top fastener, two side fasteners (one on each side) and 4 on the back. You will need a tri wing screw driver and also a small phillips drive. Keep track of your fasteners. Some will be reused, and others will NOT.
Step 2
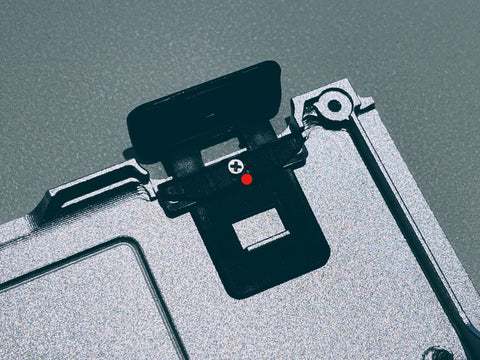
View the images below. The locations marked with a red dot are locations that need to use our included fasteners. To find the correct length, compare the original fastener to our included fasteners to find an similar length from our supply of fasteners.


Step 3
First transfer the top cover using one fastener. This is marked with red, so use one of our fasteners.
Step 4
Install the rear housing onto your switch and install the remaining fasteners. A reminder to use our fasteners at the red dot locations, and use your original fasteners at the green dot locations.