Unhinged V2 Assembly | Boxy Pixel
Boxy Pixel Aluminum Game Boy Advance SP “Unhinged” Assembly - V2 (Budget also)
This is a working document, describing the basic steps to install electronics into Boxy Pixel metal housings
There are several different modification options outlined in this document. As a consequence, your assembly may differ slightly.
There exists a possibility that not all Nintendo PCB’s are the same, so always ensure you check your voltage pins.
Items Needed:
- Original Nintendo Game Boy Advance SP (any version)
- Custom buttons - With the exception of the L and R, the stock front buttons will not fit.
- L and R buttons and power switch from your old Advance SP
- Aftermarket backlit IPS screen kit (Funnyplaying) or stock screen
- 3d printed battery retainer (if using stock battery)
Optional parts:
- Diffuser for LED's
- Headphone plug and Type C plug (if you are NOT adding type C charge board or headphone jack, these fill in the holes)
- Type C charge board if you would like to add type C charging (requires custom wiring and soldering)
- Headphone jack (requires custom wiring and soldering) - Part number SJ2-35954D-SMT-TR fits well.
- Boxy Pixel 1700 mAh battery (requires soldering)
- 28 or 30 gauge wire, and misc. building supplies
Warning!
Please take extra care with the fasteners. The fastener heads and the threads are very small. The assembly process shows the fastener lengths that we have personally found to work well, however you will need to use your best judgement.
- When assembling, do not force the fastener. If you feel resistance, reevaluate your fastener length or back out, clean and try again.
- Choosing the correct fastener is a balance between having a safe amount of thread engagement and also not putting a fastener in that is too long which can risk breaking or stripping. Take your time and reference my directions for guidance. There may be a rare instance when you need to choose a different sized fastener than the install directions if a threaded hole is too shallow!
Additional Fastener Rules:
- Ensure you have the correctly sized Philips drive that is also not worn. It makes all the difference.
- Use my installation guide as a starting point for recommended screws for a given hole location. You may need to deviate from this if there is not enough thread engagement.
- For all fasteners, make sure parts are aligned before screwing together.
- For all parts, ensure the parts are fully seated and hold the parts together when fastening. I would recommend against having the fastener pull the parts together. This is especially important when fastening the front/rear housings.
- When starting a screw, I will often turn in counterclockwise to start. You should "feel" when the screw catches the first thread. Then, I gently turn clockwise. If you feel any resistance, stop and reevaluate. Personally, I use my fingertips to turn the screwdriver while applying enough downward pressure to keep the driver engaged. If you are stripping the screw head - you have far too much resistance and/or the incorrect driver.
- Whenever you have more than one screw to attach two parts together - always start all screws first before tightening one down.
- Keeping the above rules above in mind, I first would carefully choose your screws and then do a practice run for the 4 screws that hold the front and rear housings together.
Before assembly, it is recommended (not required) to break the corners for the A/B and D-pad holes. Shown highlighted in a thin blue line, and also red lines. You can use a sharp razor blade to break the edge, or a nail file. Do not use a coarse grit sandpaper or coarse file. This step is optional but done to make sure the buttons move as freely as possible. Brass is most susceptible to needing this. I recommend clear coating your brass buttons at this stage if you plan to do so.

You can also break the edges of the buttons. Hoping my wife does not notice her missing nail file. Turn the part as you give it a quick sanding to break the edges if the corners are sharp.

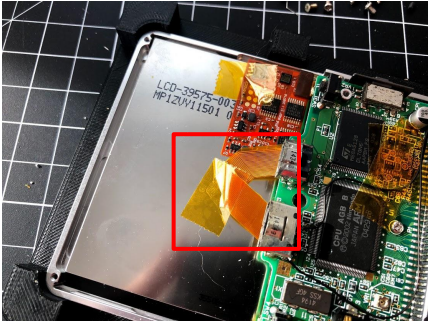
Trim the solder joints flat from the connectors to ensure they do not puncture your ribbon cable later in the assembly. This will protect your delicate LCD flex cable from damage. A piece of kapton tape over the cut solder joints is recommended to help protect your flex cable.

If using an AGS-101 Screen. Skip this step
The stock screen from an Advance SP is a VERY tight fit. If you choose to use this screen, you will need to carefully remove the foam from the backside of the screen as shown. Then, use kapton tape to cover any exposed electrical contacts. Also, spend extra time trimming your PCB flat in previous step.

Connect your screen to your Nintendo GBA SP. Test with a stock battery to verify the screen powers up and let it play a game for a couple of minutes to verify the screen and flex cable are good. We cannot offer DOA replacement screen parts if the flex cable or screen is found to be bad after assembly into the housing.

After you have tested the screen and flex cable are good: As an additional precaution, you can a couple of layers of kapton tape to your already tested flex cable. This is another added layer of protection for the parts against damage.

Lay the front housing face down, being careful to protect your shell front shell from scratches. Note: If you can raise the front and leave room for the buttons to drop down, it will make later assembly easier. Shown at right in green is a an example assembly fixture I use. It’s on thingiverse for download.

Unhinged SP Buttons - Drop in the A, B, D-pad, Start/Select and the dimming buttons

Also, ensure you have a Philips screwdriver that has a shaft which can easily fit in the 4 recessed holes in the rear housing.

There are two types of light pipes. The first type has individual pieces (shown below). The revised light pipe is a single piece. The single piece is a drop in fit.


Firmly press into its final position, then add the second diffuser

Add the silicone from you donor GBA SP

Drop in the speaker from you donor GBA SP

Unhinged Button Check:
There have been some instances where the A or B buttons feel very stiff after assembly and have no button travel. This can be caused by:
- Silicone moved slightly out of position during your assembly
- In some instances, the silicone nubs may need to be trimmed. (see image below).

If you are using a type C board, it will drop in here. There are features to help locate it. A strong thin foam double sided tape or hot glue will hold this in place.

Add a plug if you are not using the type C charge board. Glue or tape in place. Paint it if you would like it to match your shell.

Solder your positive and negative wires to the type C board. There should be a tiny + and - written on the type C board near the locations highlighted in the image.
These two power wires will be soldered to the SP PCB. The positive wire will go to the SP power connector, second pin from the right. The ground can go to the SP connector metal itself. Wiring Diagrams shown below. Note: fast charge Type C cables are not supported.

Type C to Advance SP power connection

If you are not adding a headphone jack, simply add a plug (as shown) to fill the bottom hole if you are not using a 3.5mm headphone jack. Hot glue the 3.5mm headphone jack in place.

If you are adding a 3.5mm headphone jack, it will require some extensive wiring. I recommend using magnet wire or 30ga wire (28ga will also work) with thin insulation if possible and be very mindful of wire routing. Wire diagram to follow. You’ll also need to glue the 3.5mm in place
Wiring Diagram using Boxy Pixel headphone jack

Wiring Diagram using headphone: Digikey SJ2-35954A-SMT-TR. This is our "compact" audio jack sold on our site

Depending on which backlit screen you are using, if you would like to adjust the brightness, solder in the optional wire per screen manufacturer's instructions. Funnyplaying.com has their installation instructions on their site. Soldering point shown below. Somone created a 3d printable piece that can help hold our compact 3.5mm headphone jack:

Below is an example wiring. This routing has room for improvement! After completion, I would recommend testing the headphone jack and/or Type C functionality before proceeding with mounting the board.

At this point, the board should have your screen connected and any wiring completed for the optional Type C board and headphone. Note: fast charge Type C cables are not supported. You should have already tested the IPS screen at this point.
Move the screen and SP board into position, ensuring your silicone rubber parts are staying in position and wires are not getting pinched. Let the screen hang out for the moment.
You can install 2 screws to hold the SP board in place shown in red. The short fasteners work here. Do not strip or over torque - they do not require much force!

If you have Boxy Pixel battery, feed the battery wires through the hole in the rear housing as shown by the green arrow. Then solder the battery wires to the backside of the connector on the SP board shown by the blue arrow. Skip this if you are using a stock battery.
Note: your battery may come with a connector. If you cannot fit the connector, simply cut and hardware as shown at right.

Slide your IPS screen into position.
You may need to loosen the PCB fasteners. Ensure the screen is all the way down and be mindful of the orange flex cable as it is damaged easily!

Do not make a hard crease, but careful fold the flex cable out of the way.
If using an IPS screen, use some very soft foam behind the screen to keep it in place. I recommend the foam available in our store which comes with adhesive, but also understand some people may want to use their own. It may take some experimenting to ensure there is not too much force on the screen from the foam, but enough to hold it.
If too thick, this will cause some faint dark, or orange/brown spots in the viewable area when the back aluminum piece is screwed on and the IPS screen is turned on. This is caused by too much pressure on the backside of the IPS screen

Rear Housing Pressure
Some Laminated screen kits are thicker than others. This small part variation can cause the aluminum rear panel to press on the backside of your screen and make a dark spot in the top corner. If so, grind the spot marked in black. It will not take much and can be done with a fine metal file or easily with a dremel sanding drum.

Slide the rear IPS housing into position. It partially fits under the PCB. You may need to slightly loosen the two PCB fasteners to fit this under the PCB.

Squeeze the metal parts together before turning the fasteners to ensure fasteners do not strip. Start the two fasteners at the 2 corners. These are now 5-6mm long fasteners for the V2 shells.
4mm can work if you squeeze parts together, however this can strip the threads. 6mm give plenty of thread, however you may need to run then in and out and make sure the threads are deep enough. 5mm seems to be the best and we are moving to include these. Be mindful!

Drop in your metal shoulder button posts.
Note: If you are using a plastic rear, these posts will need to be shortened.

Slide the Right and left plastic shoulder buttons over the posts and into position

Place the cart guide into the Boxy Pixel rear housing as shown. Use one fastener as shown. Use a short flathead fastener here! The other fastener is intentionally left out and has a post in its place. Use kapton over this just to be safe it doesn’t short on your PCB.

Now is a good time to do another test your buttons. Use your stock battery held in place and power on.
If there is an issue with your buttons:
- Ensure your silicone is properly in place
- If you have extra wiring, this can move silicone pieces or place pressure on silicone pieces. You may need to hot glue your wiring or use different wiring
- Aftermarket silicone rubber can have a different durometer (stiffness) that can affect this. Try stock rubber if it’s not too worn.
- If you have not already, try sanding the edges of buttons and the housing inside geometry features. Anything the buttons move along can affect the feel, so make sure all edges are rounded or chamfered.
- Cut the nub off the center of your silicone rubber that fits over the A/B buttons.
Add your plastic power switch. One method is to put the plastic switch in the Boxy Pixel rear housing. Then, ensure you line your switch up in the “off” position. Hold onto it during assembly so it doesn’t drop out of position.
Alternatively, It’s possible to also lay it in the front housing and wiggle the rear housing and switch into position.
Note: if the fit is tight after assembly, you may need to scrape the edge of your plastic switch.

Place the rear housing into position and secure with 4 fasteners using the rules outlined at the beginning of this assembly document. Caution: It’s difficult to see if you are stripping the heads.
You can use either the short 3mm or longer 4mm fasteners here. We recommend starting with 3mm and only using 4mm if there is not enough thread engagement.

Add a battery and test the unit for functionality.

If you have a boxy pixel battery, install the battery and then careful fold the wires neatly. There is a black, tough protective layer on the battery. In some areas, there can be wrinkles in this material. If you find the rear panel too tight, you may need to carefully trim off some high spots of the black wrap. Do not puncture the battery!

If you are using your stock sized battery, you may want to use our optional battery retainer. Notice the two protrusions. These wedge and push the battery toward the connector

Place the 3d printed part in place. Ensure it’s full down. If you don't have this, you can use foam or any other substitute material.

Align the rear sheet metal cover. There are two notches in the sheet metal that line up with the rear housing.
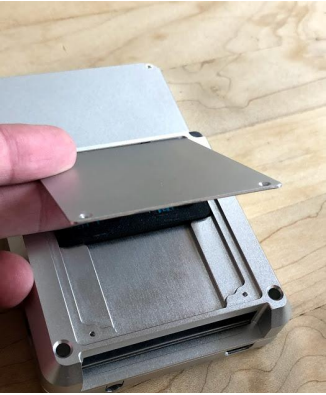
Install and secure with two flathead fasteners. Alternatively, you can flip over and use the pan head screws.

Test and tag us on instagram!
Enjoy your new GBA SP Unhinged build :)

For a printable version of this guide - click here